Threading your overlocker correctly made easy
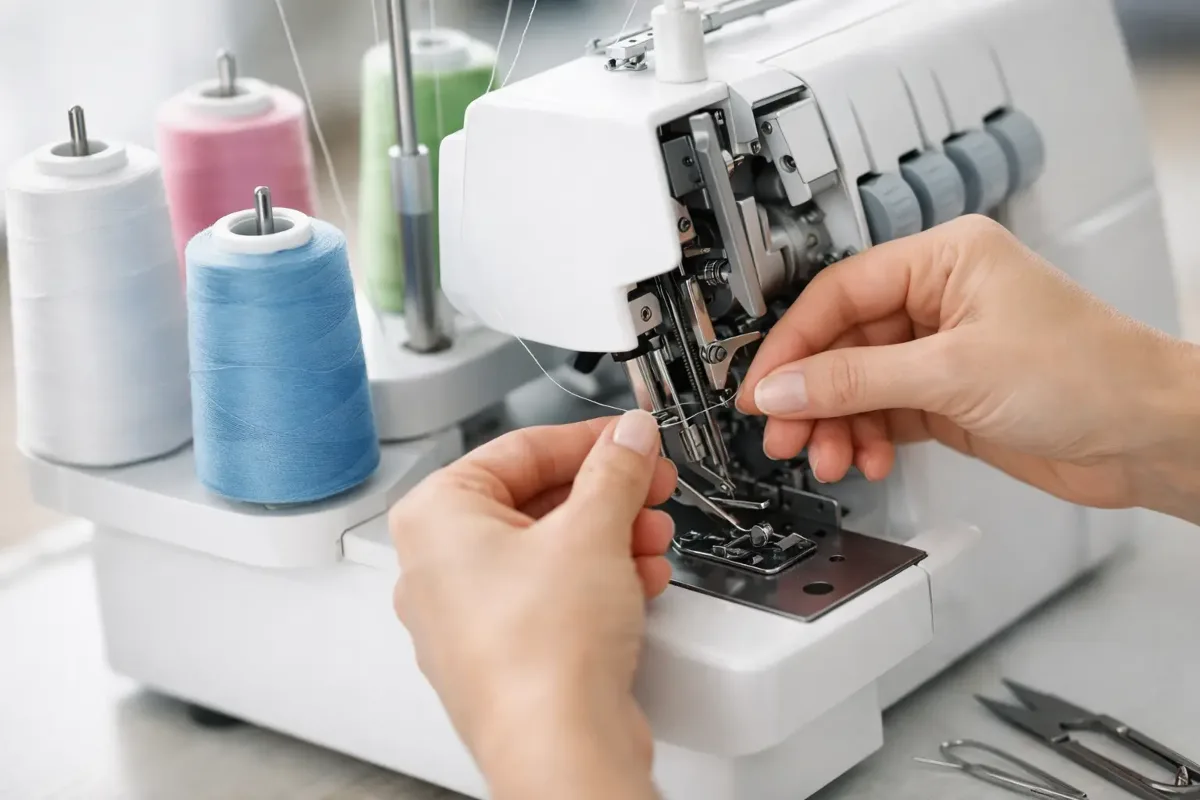
Four threads, tiny eyelets, moving loopers: threading an overlocker for the first time can feel a little daunting. But threading your overlocker correctly is no mystery. It simply comes down to getting the order right, staying calm and checking the markings on your machine. Once the threads run neatly through every guide, your overlocker will sew stretchy, durable seams and finish fabric edges in a single step.
With jersey, sweatshirt fabric or ribbing in particular, you will see the difference straight away. A correctly threaded overlocker sews evenly, cuts cleanly and keeps the seam flexible. If, on the other hand, loops hang over the fabric edge, a thread snaps or the seam suddenly turns stiff, the cause usually lies in the thread path, not the fabric.
What to prepare before threading
Set your overlocker on a sturdy table and make sure you have good light. Switch the machine off, raise the presser foot and turn the handwheel so that the needles and loopers are easy to reach. With the presser foot raised, the tension discs are open. This allows the threads to slip reliably between the discs as you lay them in, rather than just sitting in front of them.
Open the looper cover and pull the telescopic thread guide all the way up. The threads need to run freely upwards from the cones. If the thread guide is too low or a thread is caught behind a rod, it creates unnecessary drag. That alone can cause uneven stitches, even if everything else is threaded correctly.
Have the right cones ready. For most projects, polyester overlocking thread is a good choice: it is strong, runs smoothly and suits both stretch and woven fabrics. For visible seams, it is nice to match the colour exactly to your fabric. For inside seams, a similar shade is often perfectly fine, which is especially handy if you sew lots of colourful children’s fabrics.
Threading your overlocker correctly: the order matters
Every overlocker has its own thread path. Coloured dots, numbers or symbols on the housing show you which guide belongs to which thread. So always rely on your machine’s manual first. The order given there is the one to follow, even if a different model does it differently.
On many domestic overlockers, you thread the upper and lower loopers first, followed by the needles. Often you start with the upper looper, move on to the lower looper and then thread the right needle followed by the left. Some models require a different order. This is no minor detail: if the loopers are swapped or the needle threads are put in too early, the thread chain cannot form properly as you sew.
Take each thread carefully through every stage: from the cone holder via the thread guide and the upper guides to the tension discs, hooks and levers, and finally to the looper or needle. Don’t skip even the smallest eyelet, even if the thread seems to run fine at first. It is precisely these inconspicuous guides that keep the tension stable and stop the threads crossing while you sew.
When laying the thread into the tension discs, you can pull it gently downwards. You should feel it click into place. There is never any need to force it. If the thread is frayed, trim the end freshly at an angle. A clean cut is much easier to guide through narrow eyelets.
Threading the loopers without a tangle
The loopers sit behind the open cover and are the part that looks most fiddly at first. Turn the handwheel slowly towards you until you can see the relevant looper eye clearly. Some machines have a threading lever or a looper threader for this. Use it if your machine has one: it isn’t just for beginners, it saves time every time you change thread.
Make sure that after threading, the lower looper thread really does sit over or under the small hook specified. This position is crucial on some models. If the thread chain won’t close even though everything looks right at first glance, check this final stretch once more.
Thread the needles last
Once both loopers are threaded, it’s the needles’ turn. On a four-thread overlocker, you usually sew with two needle threads. The right needle produces a narrower seam, the left a wider one. For a stable four-thread overlock seam, you need both needles and both loopers.
Guide the thread through all the small hooks down to the needle bar. Then thread the needle eye from front to back. Tweezers, a needle threader or a piece of white paper held behind the needle can help if the eye is hard to see. Finally, pull all the threads about ten centimetres to the back under the presser foot.
A test run shows straight away whether everything is right
Before your cut fabric goes under the machine, sew a short thread chain. Hold the threads lightly towards the back at the start and press the pedal gently. The chain should form evenly, without threads wrapping around the stitch plate or snapping.
Next, test on a scrap of the same fabric or one of a similar weight. This is particularly worthwhile with stretch fabrics, as jersey, French terry and lightweight viscose jersey all behave differently. The scraps needn’t be large: a small piece is enough to judge the stitch appearance, cutting width and stretch.
Loops along the fabric edge suggest the looper tension isn’t right or a thread isn’t sitting properly in the tension discs. If the fabric edges pucker up a lot, the needle thread tension, differential feed or stitch length may be the culprit. Only ever change one setting at a time and sew another short test piece. That way you’ll know which change actually helped.
Common threading mistakes
A classic mistake is threading with the presser foot lowered. The threads then often don’t sit between the open tension discs. The machine may still sew a few stitches, but the result will be unreliable. Raise the foot, pull the affected threads out of the tension discs and lay them in again.
Mixed-up thread paths are also easy to come by, especially with similarly coloured threads. Feel free to use four different colours for threading. That way you can see at a glance on your test piece which thread sits where and which path needs checking. You can then switch to matching cones for the actual project.
Another stumbling block is old, fluffy or overly small reels of thread. Overlockers run fast and need thread that unwinds evenly. Large cones of overlocking thread are the practical choice here. With smaller reels of sewing thread, suitable cone holders or thread nets can help, but depending on the machine the thread may still run less smoothly.
If a thread breaks while you’re sewing, you don’t always have to rethread everything. First check that the cones are standing freely, that the thread is sitting between the discs and that lint hasn’t built up on the looper, blade or stitch plate. If the thread has slipped out of a looper or jumped out of the thread path entirely, rethreading in the specified order is usually the safest solution.
Tie on new threads or rethread completely?
When changing colour, you can tie the new threads to the old ones and carefully pull them through the thread path. This works well up to just before the needles and tension discs. Cut off the knots before they reach narrow eyelets, loopers or needle eyes, otherwise they can get stuck or even damage parts of the machine.
This method saves time, but it’s no substitute for deliberately rethreading. After a thread break, when switching to a noticeably thicker thread, or if you’re not sure all the guides are correctly threaded, a clean fresh start is worth it. You’ll get to know your machine better and avoid frustration halfway through your project.
A small routine with a big impact
After sewing, leave a thread chain in place and only cut it when you take your project out of the machine. Regularly remove lint from the looper area using the brush that came with your machine. Only apply oil where, and in the amounts, the manufacturer specifies.
Keep the manual within reach or mark the threading page with a bookmark. A small pair of tweezers next to your overlocker will also make your next thread change more relaxed. And if you get stuck despite the instructions, personal advice is often quicker than lots of trial and error. At Die Stoffkönigin, we’re happy to look at which thread suits your project together with you.
With a little practice, threading will become second nature before you start sewing. Next time you change colour, take two extra calm minutes, follow the markings on your machine and treat it to a test on a fabric scrap. Then your actual sewing project can begin in a completely relaxed way.